MEDSUITE FOLLOWUP QUEUE
The Followup Queue in MedSuite provides a means of following-up on claims and accounts on the screen, virtually eliminating the need to run lengthy followup or delinquency reports. Followup "queues," built by criteria determined by each practice, allow "actions" to be taken on a claim or account, track those actions by user, and allow the user to set a future followup date at which point it will re-appear in its queue.
This document covers the setup steps necessary to begin building the Followup Queues, and then contains instructions on the use of the Queues.
| 1. | Setup Followup Action Classes (global) |
| 2. | Setup Followup Action Codes (global) |
| 3. | Setup Followup Actions (by practice) |
| 4. | Setup Followup Queue Definitions (by practice) |
| 5. | Closeout – Create Collection Followup |
| 6. | Working with the Followup Queue |
| 7. | Followup & the Ledger |
| 8. | Followup Report |
INTRODUCTION: ACTION CLASSES, ACTION CODES, & ACTIONS
Action Classes are used to categorize Action Codes, which are used to categorize Actions.
Actions are performed on claims and accounts. A default timeframe is specified for the next action to take place. ACTIONS are practice-specific, because different practices may have different procedures regarding these timeframes.
Action CODES categorize the Actions and specify if the system should perform some special function, such as calling the Followup Wizard or sending a Form Letter when an Action is performed.
Action CLASSES categorize the CODES for reporting purposes only. Action CLASSES and CODES are set up globally and apply to all practices.
The Followup Report can break on and select on all three of these.
Let's look at some examples:
Action CLASSES are general, broad categories of actions, such as CONTACTS, PROMISES, CORRESPONDENCE, OTHER.
Action CODES are more specific. These might be LEFT MESSAGE, BUSY SIGNAL, CALLED & SPOKE, CONTACT, INS CONTACT, CLAIM FOLLOWUP, PT CORRESPONDENCE, INS CORRESPONDENCE.
The Actions themselves may be even more specific. Actions that fall under the PT CORRESPONDENCE CODE might be PT UCR LETTER, PT PAST DUE LETTER, PT PAY PLAN LETTER. Actions under the CLAIM FOLLOWUP CODE could be REFILE CLAIM, RESET BILLING SAME PLAN, RESET BILLING NEW PLAN.
The following table illustrates with a few examples how the hierarchy of Classes, Codes, and Actions might be structured.
ACTION CLASS |
ACTION CODE |
ACTION |
Correspondence |
Pt Correspondence |
Pt UCR Letter |
Pt Past Due Letter |
||
Pt Payment Plan Letter |
||
Request Statement |
||
Ins Correspondence |
Ins UCR Letter |
|
Ins Appeal Letter |
||
Contacts |
LM |
LM for Patient |
LM for Insurance |
||
Called & Spoke |
Spoke with Patient/Acct |
|
Spoke with Insurance |
||
Busy Signal |
Busy Signal at Pt |
|
Busy Signal at Ins |
||
Promises |
Promise to Pay |
Promise by Patient |
Promise by Insurance |
||
Other |
Claim Followup |
Refile Original Claim |
Refile Corrected Claim |
||
Reset Ins Billing - New Plan |
||
Reset Ins Billing - Same Plan |
||
Add to Coll Turnover |
Add to Coll Turnover |
|
Billing |
Suspend Statements |
|
Un-suspend Statements |
||
Reset Self Billing |
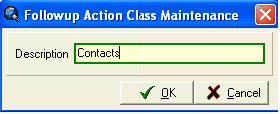
SETUP FOLLOWUP ACTION CLASSES (GLOBAL)
Action Classes categorize the Action Codes for reporting purposes only. Action Classes are set up globally and apply to all practices
To set up the Action Classes, go to Setup, Followup, then Followup Action Classes. Select NEW and enter the name of the Class.
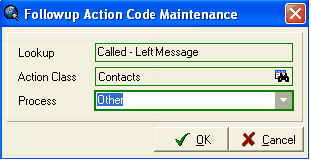
SETUP FOLLOWUP ACTION CODES (GLOBAL)
Action Codes categorize the Actions and specify if the system should perform some special function, such as calling the Followup Wizard or sending a Form Letter, when an Action is performed.
To set up the Action Codes, go to Setup, Followup, then Followup Action Codes. Select NEW to add an Action Code. Enter the description, the associated Action Class, and a Process.
 .
.
PROCESS:
The Process is used to specify how the system responds when an action with this action code is taken. In other words, it specifies how the system will respond when an Action Code with a certain Process is selected. A drop-down list displays the different Process options.
Collection – Turnover: This will invoke the Collection Turnover Maintenance window which will prompt the user to enter the Account Class, Account Type, and Agency that should be added to the account when it is turned over to collections. The account is then added to the Collection Turnover file.
Correspondence: This will cause the system to prompt the user for the Form Letter that is to be sent. The form letter will be mail merged during the next Closeout (assuming that option is selected during the Closeout).
Followup Wizard: This will invoke the Followup Wizard where the user will then proceed to take further steps, such as resetting the insurance, requesting a statement, refiling a claim, etc.
Promise: This will cause the system to prompt the user for the amount that has been promised. The system will then monitor that account for the payment. If the amount promised is not received by the date specified, it will incur a "broken" status. The amount promised is used on accounts only, not claims.
Other: No additional special processing is done by the system. Only a next followup date is set. This would be used for action codes such as LM, Busy Signals, Called & Spoke.
SETUP FOLLOWUP ACTIONS (BY PRACTICE)
Actions are performed on claims and accounts. A default timeframe is specified for the next action to take place. Actions are set up by practice in order to allow one practice to be managed differently than another by having a different number of followup days for certain actions in certain practices, if a billing company has different arrangements with different clients in regard to how claims/accounts are worked.
To set up Actions, go to Setup, Followup, then Followup Actions. Select NEW to add an Action.
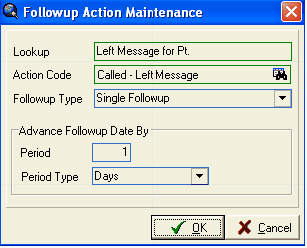
After entering the description of the Action in the Lookup field, enter the Action Code to which this Action should be linked.
Select a Followup Type, which are displayed in the drop-down list:
| • | Single Followup: This action may only be performed on one claim/account at a time, such as Left Message for Pt, Spoke w/Pt, Promise by Pt. |
| • | Batch Followup: This action may only be performed on multiple claims/accounts. |
| • | Single and Batch Followup: This action may be performed either on a single claim/account, or on multiple claims/accounts at the same time. Possible examples may be Refiling Claims, Add to Turnover, Sending Letters. |
FOLLOWUP DATES
Advance Followup Date By is used to specify how far the Followup Date of a claim/account should advance so that it is again displayed in the Queue. This, of course, assumes that it still meets the queue criteria. For example, if a Refile Claim action advances the Followup Date by 14 days, the claim will be redisplayed in the Queue in 2 weeks if it still meets the criteria that adds claims to the Queue (i.e. if it is still delinquent and has not been paid). If the claim no longer meets the criteria (i.e. if it is paid) then it will NOT be displayed in 14 days. The default Period Type is Days; you may specify the number of days before the claim/account should be displayed. Other period types are minutes, hours, weeks, and months.
Note that this is merely a default. Users may override the date and time at the time they use an action on a claim/account. However, there are some edits on how they may override the default. A user may override the date to any date sooner than the default, but they are limited on how far into the future they can override the default. They may enter a date that is double the default, unless the default is 1 or 2 days; in that case, they may enter a date up to 5 days in the future. For example, if a Refile Claim action advances the Followup Date by 14 days, a user may override the date that displays by 28 days into the future but no more. If a Left Message Action advances the Followup Date by 2 days, they may override the date that displays by another 3 days into the future but no more (for a total of 5 days from the current date).
SETUP FOLLOWUP QUEUE DEFINITIONS (BY PRACTICE)
Queue Definitions are used to define what is put into the Followup Queue. For example, at what point do Claims get sent to the Followup Queue, and what point do Accounts get sent to the Followup Queue? Different Queue Definitions may be created so that certain claims are added to the Queue at a certain timeframe, and others are added at other times. The Queues are built during the Closeout when that option is selected. New claims/accounts that meet the criteria will be added to the Queue so that users see them the next day. The queues can be updated nightly during the Closeout so that new accounts are added and paid claims/accounts are removed. Other practices may choose to only update the Queues weekly so that new claims/accounts are not added every day. This is up to the discretion of the practice.
Note that after adding a new queue definition, claims/accounts will not show in that Queue in the Followup Queue until after the Close Out has been run and the option to Create Collection Followup has been selected.
To set up the Queue Definitions. go to Setup, Followup, then Queue Definitions. Select NEW to add a Queue Definition. The following screen is displayed.
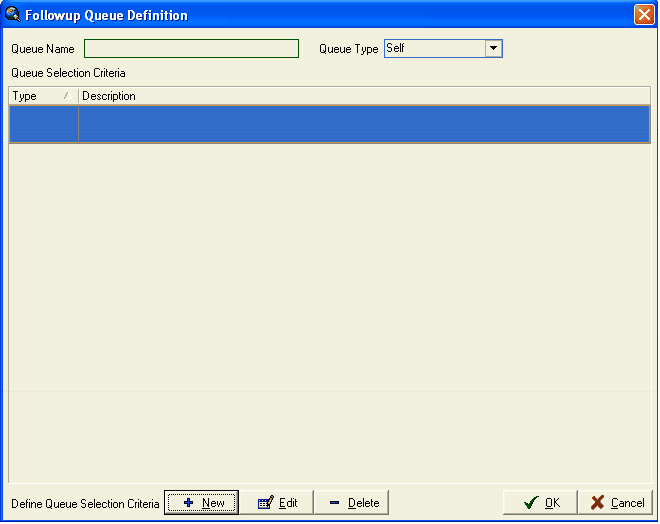
In the drop-down box in the top right, indicate whether you are creating an Insurance Queue or a Self Queue, then select New.
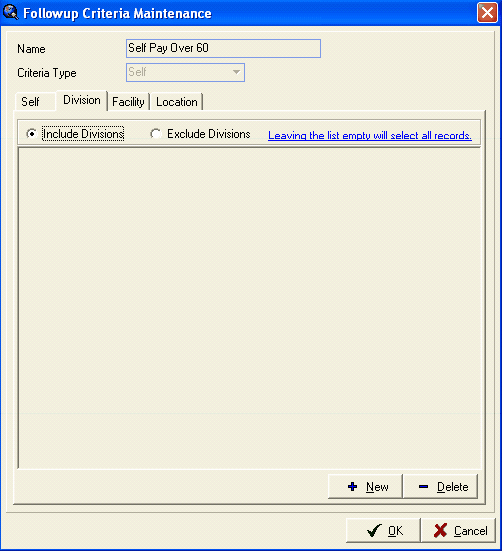
SELF QUEUE TYPE
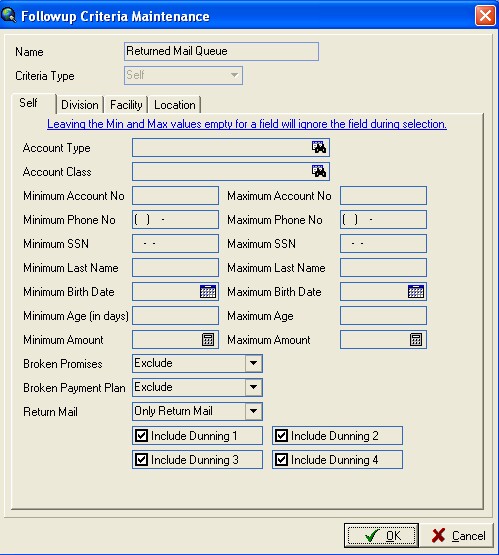
If you select the SELF queue type, the following box is displayed where you will then indicate the specific criteria of the accounts that should be added to this queue.

In the screen example above, it will simply select accounts with self pay balances that are over 60 days old with no payment. You may specify particular Account Types, Account Classes, build the queues alphabetically and have separate queues for different parts of the alphabet, specify dollar amounts, etc. You may specify to only include accounts with a particular dunning level. The example above has excluded Broken Promises and Payment Plans as well as Return Mail. You may want to create separate queues for those types of accounts because they may need attention sooner than 60 days, for example.
Note that a Queue can be rather generic, such as Self Pay over 60 as above. Users will have the ability in the Followup Queue to use "filters" to narrow down the accounts they see, instead of seeing everything in the Queue. For example, the Queue will contain all accounts with self pay balances that are over 60 days old with no payment. Instead of looking at all those accounts, a user may then filter by this same criteria and look at accounts over a certain dollar amount, accounts over 120 days, accounts in a certain account class or type, or a portion of the alphabet.
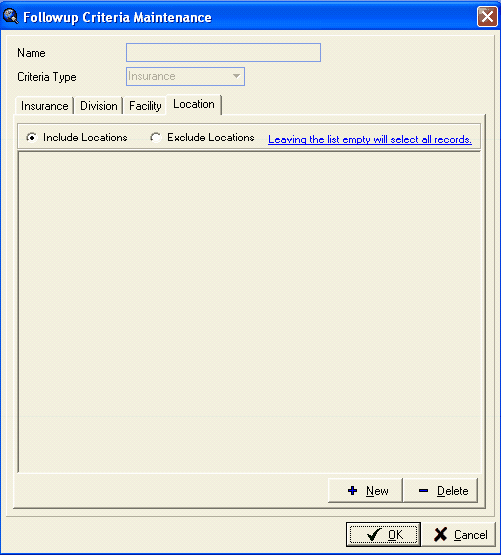
If you wish to build separate Queues by Division, Facility, or Location, access the separate tabs to indicate which one(s) you would like to include or exclude. If you wish to include accounts for all divisions, all facilities, and all locations, leave these tabs blank.
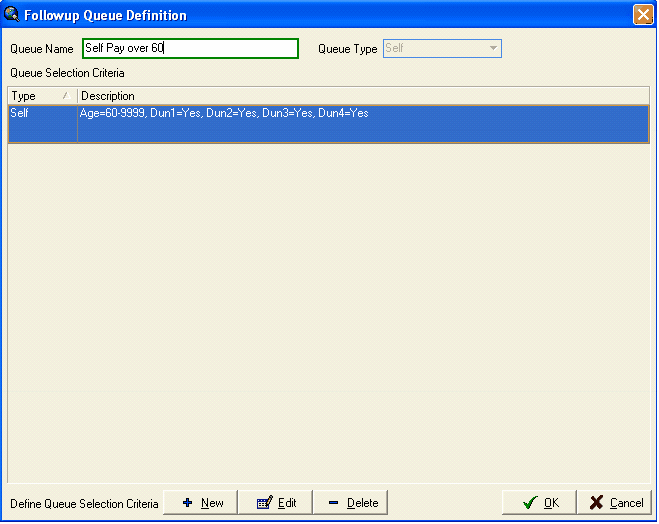
After completing the screen and selecting OK, you will be returned to the previous screen, with the Queue Selection Criteria that you just entered showing in the Description on the grid. Enter a Queue Name that describes the Queue you have just defined. Select OK to save the Queue Definition.
SELF PAY BROKEN PROMISES & PAYMENT PLANS
You may need a separate Queue for monitoring promises and payment plans. If patients make partial payments and not the agreed-upon amounts of the promise or payment plan, you will need a place to monitor and followup on those accounts. A partial payment on an account with a Promise that is greater than the Minimum Payment amount will reset the aging on the account, even if it is not the amount that was promised. Therefore, it is possible that it may not show up in a Self Pay Queue if your queues are set up to only show delinquent accounts (with a minimum age of 45 or 60). In addition, if you use the Payment Plan amounts on the Account Billing tab to set up monthly payment plans, you may monitor those accounts via a separate Followup Queue.
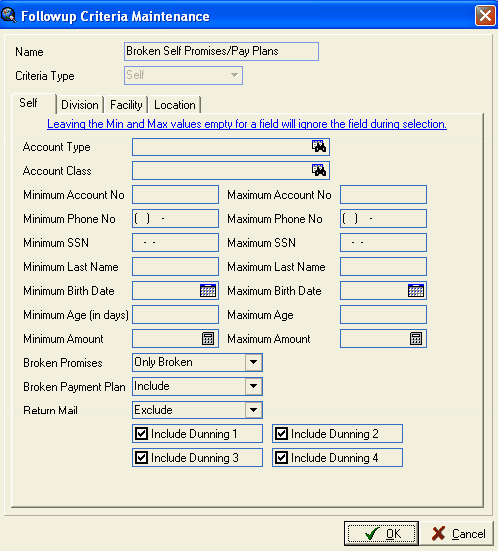
To ensure that you see any accounts where the promise is broken because only a partial payment is made, or any accounts where they have failed to pay an amount equal to or greater than they Payment Plan amount on the Account Billing tab, create a Self Pay Queue with TWO SEPARATE CRITERIA. They will each have NO max or minimum age. In the first, specify Only Broken Promises and Include Broken Payment Plans, as in the example below.
Then, create another criteria with no max or minimum and specify Include Broken Promises and Only Broken Payment Plans, as in the example below.
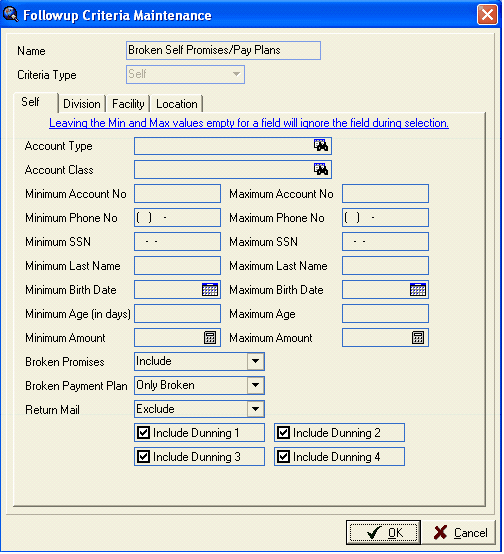
The Queue Definition screen will look like this, with the two separate criteria for the Broken Promises and Broken Payment Plans. It is important to have two separate criteria because if you build just one that says "only" broken promises and "only" broken payment plans, you will get no accounts as they will exclude each other.
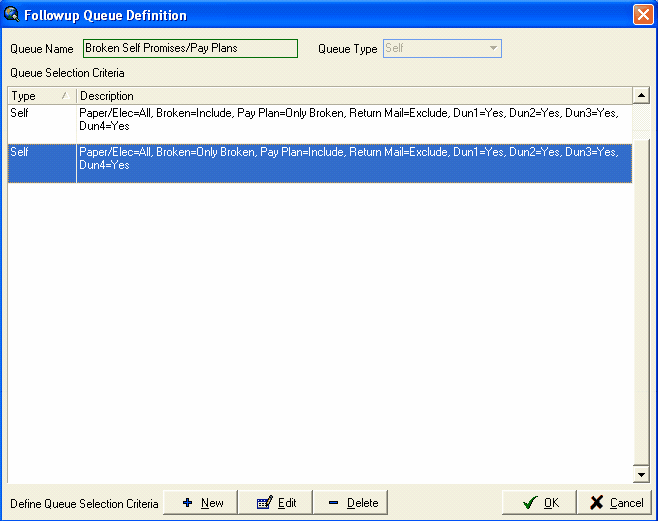
If you would like this Queue to display all the self pay broken promises and payment plans and you do NOT want to display self pay broken promises and payment plans in any OTHER self pay queues, specify that you want to EXCLUDE Broken Promises and Broken Payment Plans in the other queues so that the accounts do not show up in BOTH queues. See the example below.

SELF PAY RETURN MAIL
You may wish to create a separate Queue for monitoring accounts flagged for Return Mail, to eliminate the need to run an Account Listing report for return mail.
Do not enter any Minimum or Maximum Age, as the aging is reset when the account is flagged for Return Mail. Not specifying any age will ensure that all return mail accounts are pulled into the queue.
INSURANCE QUEUE TYPE
If you select the INSURANCE queue type, the following box is displayed where you will then indicate the specific criteria of the claims that should be added to this queue.
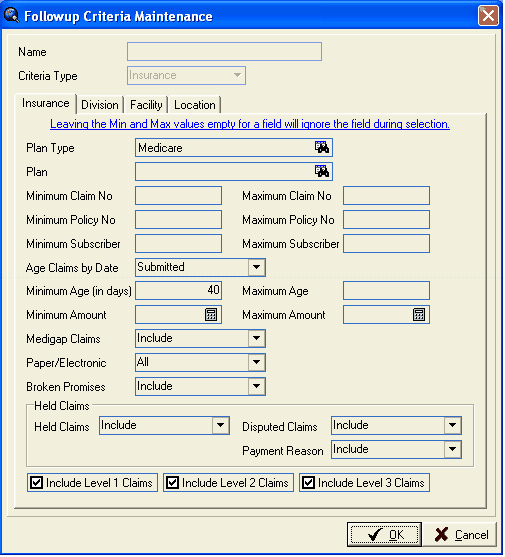
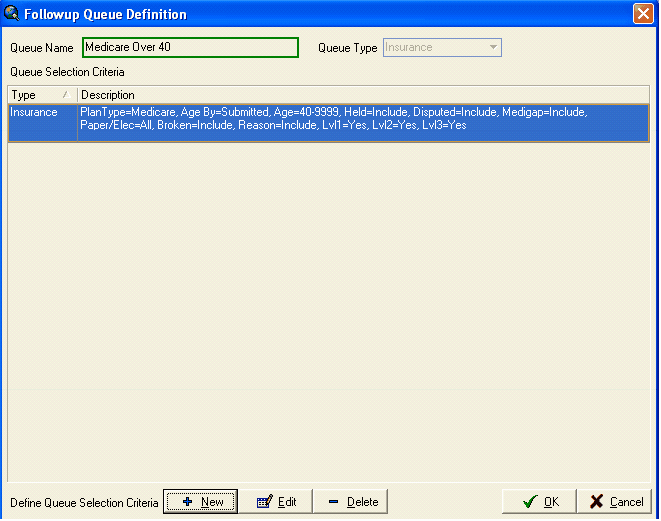
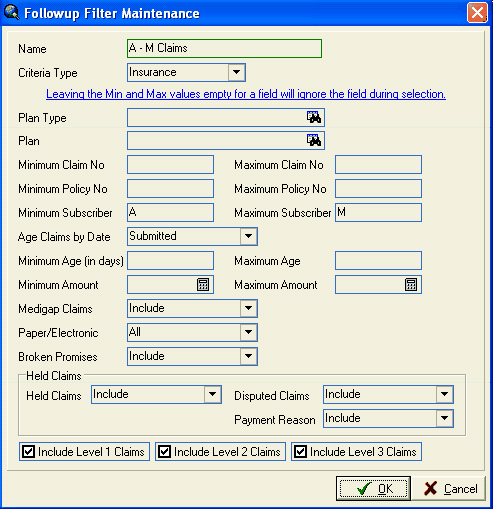
In the screen example above, it will simply select for Medicare Plan Types open claims that are over 40 days old from the Submitted date whether they are primary, secondary, or third level claims. Additionally, you may specify Paper or Electronic, build the queues alphabetically and have separate queues for different parts of the alphabet, specify dollar amounts, etc. Although this example includes broken promises, you could exclude them and create a separate queue that includes only claims with broken promises. This example includes claims flagged as Held/Disputed and with a Reason flag, but you could exclude those and create a separate queue for those if you so desired.
Note that a Queue can be rather generic, such as MCR Over 40 as above. Users will have the ability in the Followup Queue to use "filters" to narrow down the claims they see, instead of seeing everything in the Queue. For example, this Queue will contain all open Medicare claims that are over 40 days old. Instead of looking at all those claims, a user may then filter by this same criteria and look at claims over a certain dollar amount, claims over 120 days, only Held/Disputed claims, exclude Medigap claims, narrow it down to a portion of the alphabet, or specify primary claims only, for example.
The MEDIGAP CLAIMS field has three different options: Include, Exclude, and Exclude Medigap Claims with Unpaid Primary Claims. You may include all Medigap claims, which will include them whether or not Medicare has already paid. Optionally, you may exclude all Medigap claims and not display any of them. The third option allows you to build the queue to show only the Medigap claims where Medicare has already paid, by excluding Medigaps on visits that Medicare has not yet paid. The Medigap claims that do show will be aged from the date of the Medicare payment. It is recommended that in the Insurance Queues you select the option to Exclude Medigaps with Unpaid Primary Claims so that they do not display in the Queues.
If you wish to build separate Queues by Division, Facility, or Location, access the separate tabs to indicate which one(s) you would like to include or exclude. If you wish to include accounts for all divisions, all facilities, and all locations, leave these tabs blank.
After completing the screen and selecting OK, you will be returned to the previous screen, with the Queue Selection Criteria that you just entered showing in the Description on the grid. Enter a Queue Name that describes the Queue you have just defined. Select OK to save the Queue Definition.
MULTIPLE CRITERIA WITHIN ONE QUEUE
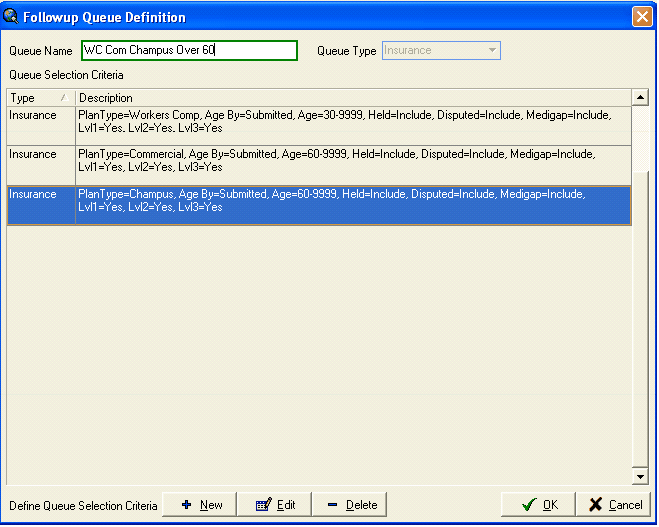
Several Queue Selection Criteria may be created that all make up one Queue Definition. For example, one queue could be created that includes Commercial, Workers Comp, and Champus claims.
Again, remember that "filters" can be used within the Followup Queue to narrow down the list of claims that are displayed.
It is strongly suggested that the Queues be built to break down the claims in some manner, such as by Plan Type, so that there is not one enormous queue for all claims over 45 or 60 days old. The drawback to having one large queue is that when a user opens the queue in the morning, it will take some time to download the queue to their local machine. Smaller queues make this process more manageable.
A NOTE OF CAUTION:
As noted previously, when defining queue criteria, a Plan Type or a Plan may be specified and is suggested, as in the Medicare example given previously. If you decide to build queues by Plan Type or Plan, you will need to be sure that queue criteria are created for each and every plan or plan type that needs to be seen in the Followup Queue. Because multiple criteria can be specified when creating a Queue, as in the example above, it does make it easier in that you do not need a Queue for every plan or plan type. However, you will need to make sure that there is a criteria for each plan or plan type that goes into a Queue. In the example above, one Queue was created that has COMM, WC, and Champus claims in it. We just need to make sure that other Queues cover all the other remaining plan types that exist. Remember that if you ever add a new plan type in your practice, then you will also need to update your Followup Queue Definitions so that new plan type is included in the Followup!
SUGGESTION:
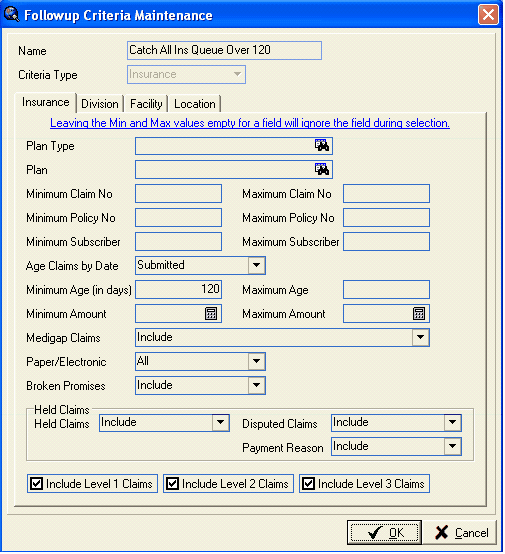
In order to ensure that claims do not "fall through the cracks" because of a Plan Type inadvertently not having been created that will catch those claims, you might want to set up a "catch all" queue for very delinquent claims that can be used as a spot check. It could be set up as follows to catch all claims over 120 days that are still open.
Another "spot check" that could be used is the Claim Delinquency Report run periodically for very delinquent claims to ensure that these claims are being worked.
PAYMENT REASON CODES AND INSURANCE FOLLOWUP QUEUES
Payment Reason Codes can be configured so that Held/Disputed claims are flagged as having a Reason Code. This will allow users to access queues or filters that will display only claims that have been flagged with reasons on them for additional review or appeal. (Note that claims that have been Held/Disputed without reason codes may also be accessed separately by using the options available in the Queue Criteria or in the Filters).
To configure the Reason Codes to use this functionality, go to Setup, Financial, and Payment Reasons.

Payment Reasons can be set up so that when used, they default the status to Paid, Held, Denied, or Disputed. If a Reason is set with the Held or Disputed Reason Type, then the option is available to Send To Followup Queue. Held/Disputed claims remain open and remain in the Followup Queues, whereas Paid and Denied claims do not. The option here on the Payment Reason to Send To Followup Queue flags the claim in such a way that the Followup Queue knows that it is not only Held/Disputed, but that it is flagged with a Reason.
In order to display claims that are flagged with a Reason, you might want to set up a queue that will pull those claims regardless of the age of the claim. If you've set up queues to show delinquent claims, you might not see all the claims that have been Held/Disputed with a Reason Code if they do not meet the minimum age. Therefore, you need a queue to pull those regardless of the age. If you want to keep those separate from the other queues, you can set up the delinquent queues to exclude the Held/Disputed claims, and just have them show up in their own queue (or they might show up in both queues.
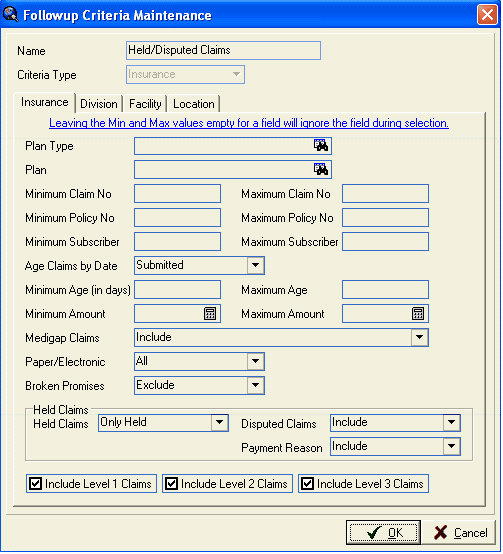
The queue example above will pull ONLY HELD claims, regardless of age, including ones that have been flagged as disputed, and including ones that have Reason Codes on them.
NOTE: In Payment Entry a claim may be HELD. A claim may be DISPUTED, which means internally to the system that it is also HELD (although one flagged as HELD is not always flagged as DISPUTED). HELD claims or HELD/DISPUTED claims may either have REASONS on them or not. The example above includes all of them.
CLOSEOUT – CREATE COLLECTION FOLLOWUP
The Followup Queues will be built and populated with the claims/accounts that meet the criteria you've specified when the Close Out is run with the option selected to Create Collection Followup.
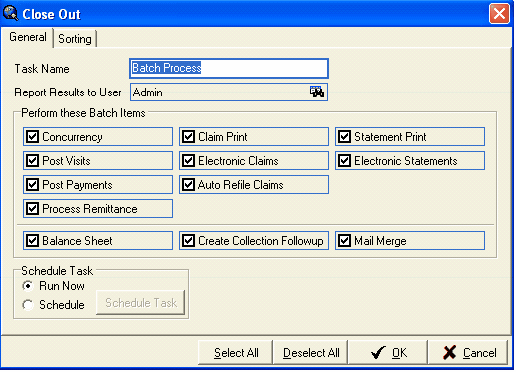
New claims/accounts that meet the criteria will be added to the Queue so that users see them the next day. The queues can be updated nightly during the Closeout so that new accounts are added and paid claims/accounts are removed. Other practices may choose to only update the Queues weekly so that new claims/accounts are not added every day. This is up to the discretion of the practice.
When creating the Followup Queues, the system includes in the Queue claims/accounts with followup dates/times up to 15 days past the current date, even though users will not see them on their screen until the specified date/time. After the queues have been built the very first time and users have begun working claims/accounts and advancing the followup dates, each time the queues are built they include claims/accounts with followup dates up to 15 days in the future. Therefore, it IS possible to build the queues weekly or bi-weekly and still have claims/accounts show up on the specified followup date, although NEW claims/accounts that meet the followup criteria will NOT be added to the queues, and claims/accounts that have received payments on them will NOT be removed or updated in the queue. This would be much like a Delinquency Report that is run and is not updated until it is worked again.
NOTE: The Closeout will produce a YELLOW entry in the Task Viewer called Followup Queue Creation. The task has run, but there is no output created, so the task is yellow. As noted in the legend in the Task Viewer, "items highlighted in yellow are tasks that ran with no output." No output tasks are on a short delete cycle of 5 days.
A NOTE OF CAUTION if you do not Create Collection Followup nightly:
The queues will need to be recreated every two weeks to ensure that claims/accounts are added to the queue with followup dates that fall into the 15 day window that was described above.
Let's look at an example scenario:
Q created October 1. Accounts are worked, followup dates entered of November and December. These STAY in the queue and will show up in November and December if the queue is never created again.
Q created October 15. New claims/accounts added, paid claims/accounts removed. Claims/accounts with followup days up to 15 days in the future are in the queue so they will display on the appropriate day. Claims/accounts with November and December followup dates are removed (because they are beyond the 15 day window).
Q NOT created until November 15. Claims/accounts that had followup dates of November 1 – 15 did not show up at the appropriate time. They will show up now, however, when the Q is built on November 15.
WORKING WITH THE FOLLOWUP QUEUES
Access the Followup Queue by clicking the Followup Button on the Dashboard Toolbar, or entering the short-cut key combination CTRL+Q, or by selecting Followup Queue from the Queues menu.

Press F9 or click the search on the Queue field to display a list of the Followup Queues. Select the Queue that you wish to view.
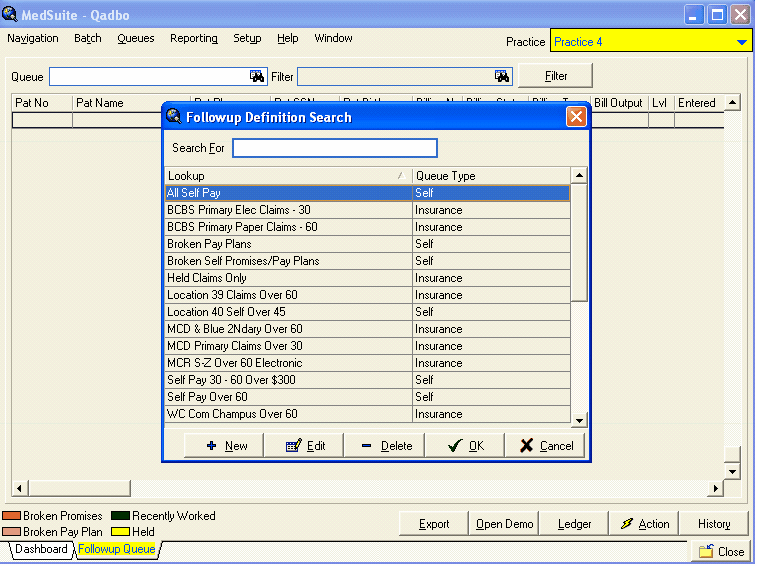
Select the Filter button to go ahead and display the entire Queue without applying any filters to it. Filters are discussed further later in this manual.
NAVIGATING THE FOLLOWUP QUEUE
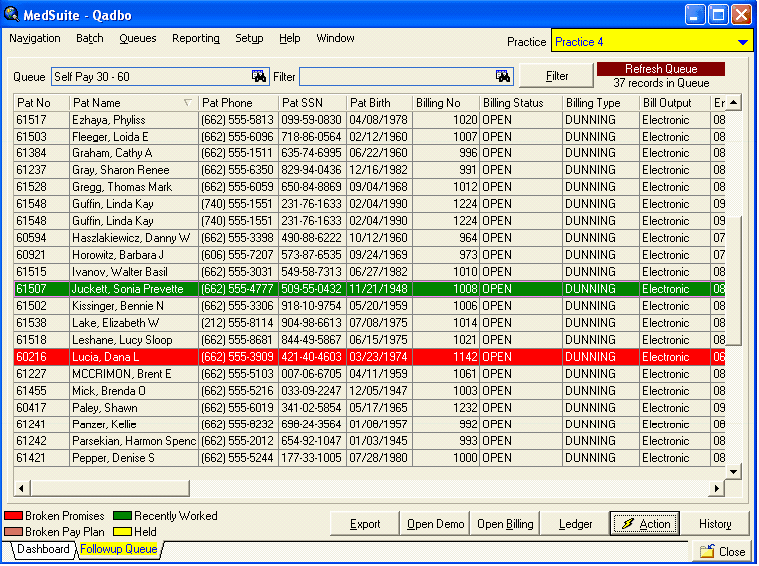
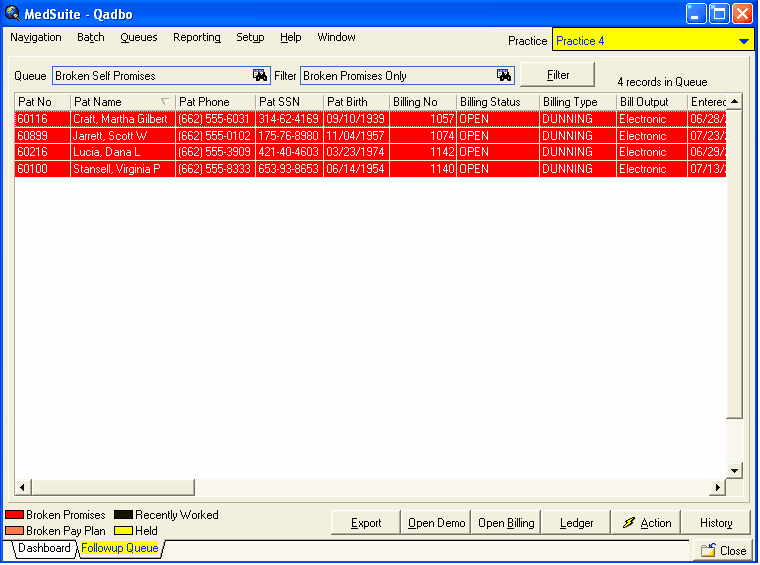
The following example shows accounts with self pay balances over 60 days with no payment. No filters have been applied.
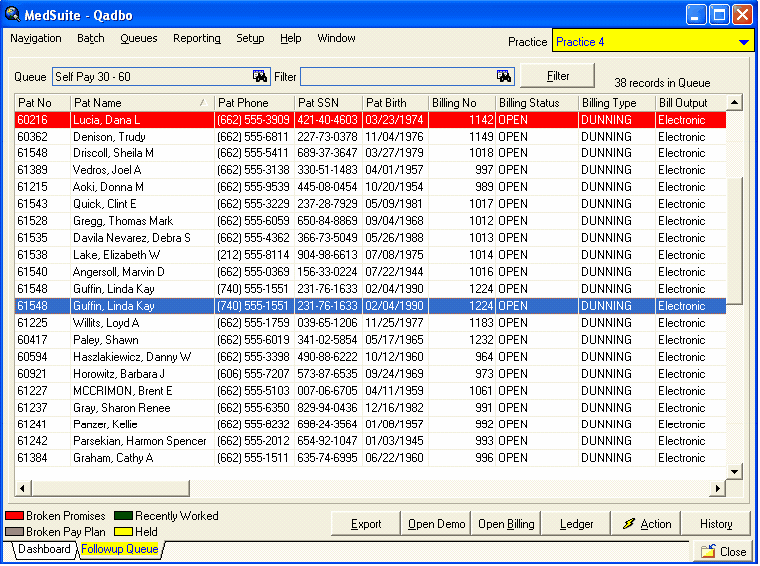
Use the horizontal and vertical scroll bars to move around the grid to see all the data for each record, and to see more records that follow. The system displays the number of records contained in the Queue in the top right corner so that you have an idea as to what you're going to be looking at.
There are many ways to control how this screen is displayed.
| • | Clicking at the top of any of the fields sorts the records in that order so that you can list them by Patient Number, alphabetically by name, or group by Acct Class, sort by patient birthday, phone #, Service Date, Amount Billed, etc. |
| • | Fields may be rearranged by dragging columns to the left or right. |
| • | Fields may be removed by using a right-click, then the Remove option. A list of all the fields will be displayed so you can proceed to remove the ones you do not wish to see. After removing fields, you may always use a right-click then the Add option to put them back. |
| • | After rearranging or removing fields, the Default option will restore the fields to their original default setting. Right-click, then select the Default option. Changes that a user makes to a Self Queue display apply to all Self Queues that user brings up on their machine. Insurance Queues retain the last setup done for an Insurance Queue. |
BUTTONS:
![]()
After clicking on a record to select it, the buttons at the bottom of the screen will allow different functions to be performed.
Export: Invokes the Export Wizard which allows Followup Queue data to be exported to a text file, Excel file, Word file, etc. This feature might be used by managers wishing to run some additional data analysis or reports on the Queue data.
Open Demo: Opens the Patient Demographics for the selected record. Note that it opens a separate window that can be closed with the CTRL+E shortcut (E as in Exit).
Open Billing: Opens the Account Holders Billing Tab for the selected record. This allows quick access to change Acct Class or Types, Suspend/Un suspend statements, and set the Return Mail flag. Note that it opens a separate window that can be closed with the CTRL+E shortcut (E as in Exit). This button only displays in Self Queues.
Ledger: From a SELF Queue, this opens the Account Ledger for the selected account record. From an INSURANCE Queue, this opens the Patient Ledger for the selected claim record. Note that it opens a separate window that can be closed with the CTRL+E shortcut (E as in Exit).
Action: Displays the Followup Action dialogue box where you specify what action you are taking on the claim/account and the next followup date. This will be discussed in more detail later in this manual.
History: Displays the Followup Activity box which lists followup actions that have previously taken place on this claim/account. Some other information is displayed as well, such as the Account Name, Address, and Phone #, and billing information such as bill dates and dunning level.
REFRESH QUEUE alert:
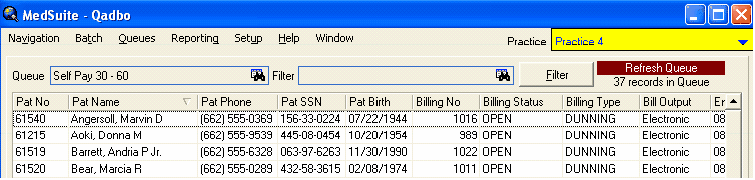
You may see an alert in the top right corner of your screen periodically. This is letting you know that additional entries should be displayed in your queue because the next followup date/time have been met. For example, you might call and get a busy signal, and set followup date/time for 2 hours in the future to try again. This will display in 2 hours to let you know that there is an entry out there whose followup date/time has passed, and you need to refilter to refresh the screen to display the entries that should now be followed up on.
Note: Self Queue displays records by VISIT, so you could see a patient listed more than once if there are multiple visits that have met the queue criteria.
FILTERING THE FOLLOWUP QUEUE
"Filters" may be applied to Followup Queues to limit the number of claims/accounts that are on display, to make working the Queues more manageable if they are very large.
After selecting the Queue you wish to work in, press F9 or click the search on the Filter field to display a list of the available Filters. Select the Filter that you wish to apply to the Queue.
To create a new filter, select New from the Followup Filter Search window.
Enter a Name for the Filter. If you've accessed the Filter Maintenance from a Self Queue, the Criteria Type will default to Self. If you've accessed the Filter Maintenance from an Insurance Queue, the Criteria Type will default to Insurance. Enter the filter criteria you'd like to use.
Examples of Filters could be ones that select portions of queues based on the last name alphabetically, Filters to display only primary or secondary and third level claims, Filters to display only Disputed claims, only paper or electronic claims, claims/accounts over a certain amount, Filters by Acct Class or Acct Type, etc.
A NOTE OF CAUTION if you are using Filters:
Filters limit the number of records that are displayed from within a queue. For example, a Medicare queue might have 200 claims in it, but after applying a filter to show only Primary claims, it might be limited to 180. Or, if you apply an A-L filter it will only show claims for patients with a last name starting with A-L. If you limit the queues with the use of filters, you will need to make sure that another appropriate filter is run to display any other claims you may wish to see, such as claims for patients with a last name starting with M-Z.
QUEUES AND MULTIPLE USERS
Ideally, one user should access a queue at a time, or the queue should be filtered in such a way that users are accessing different claims/accounts within the queue. For example, in a Self Pay Over 60 queue, it could be filtered so that someone sees A-L accounts and someone else sees M-Z accounts so that they are not trying to work on the same queue entries simultaneously.
However, it is possible for multiple users to access a queue if so desired. After the queue has been opened by one user, any subsequent users who open it will receive a warning message alerting them that the queue is already open by someone else. This is merely a warning, and the user may continue on to use the queue.
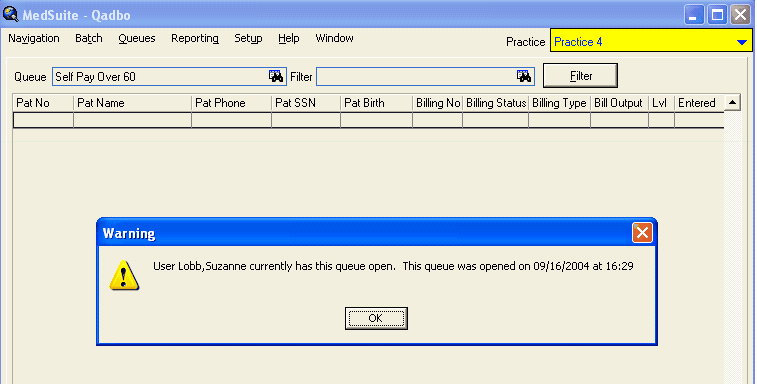
If the warning is received, it is advised that the user refresh their displayed entries periodically by re-filtering. This will remove from their display the entries that the first user has worked and updated with a future followup date.
However, it is possible for multiple users to access a queue if so desired. After the queue has been opened by one user, any subsequent users who open it will receive a warning message alerting them that the queue is already open by someone else. This is merely a warning, and the user may continue on to use the queue.
If the warning is received, it is advised that the user refresh their displayed entries periodically by re-filtering. This will remove from their display the entries that the first user has worked and updated with a future followup date.
ACTIONS WITHIN THE FOLLOWUP QUEUE
Once you are in a Queue you will take Action on claims/accounts within the queue. As discussed in the BUTTONS section previously, after selecting a record in the queue, you may view a ledger, go to demographics, account billing, and view the followup history. The ACTION button at the bottom of the screen will display the Followup Action dialogue box where you specify what action you are taking on the claim/account and the next followup date.
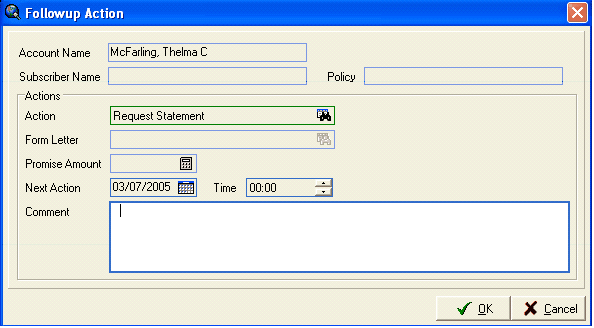
Choose the Action that you are taking.
The Form Letter field is only active when you've selected an Action that is linked to an Action Code that has a Process Type of Correspondence.
The Promise Amount field is only active when you've selected a Self Pay record and an Action that is linked to an Action Code that has a Process Type of Promise.
In this example where the Action is linked to an Action Code that has a Process Type of Other, the cursor will jump from the Action to the Next Action date and time fields.
The Next Action date will default to a future date and/or time if the Action is set up with a period to advance the Followup Date by. For example, the date/time may advance by 2 days or 14 days or 2 hours or 1 week. If the Action is NOT set up to advance the Followup Date, the current date will display.
You may override the date to any date sooner than the default, but you are limited on how far into the future you can override the default. You may enter a date that is double the default, unless the default is 1 or 2 days; in that case, you may enter a date up to 5 days in the future. For example, if a Refile Claim action advances the Followup Date by 14 days, you may override the date that displays by 28 days into the future but no more. If a Left Message Action advances the Followup Date by 2 days, you may override the date that displays by another 3 days into the future but no more (for a total of 5 days from the current date).
After selecting OK to save the action, you are returned to the Queue.
The queue entry you just worked will display in green. You may continue to take additional actions on it. To remove the green entries from your screen, simply Filter again.
Collection-Turnover
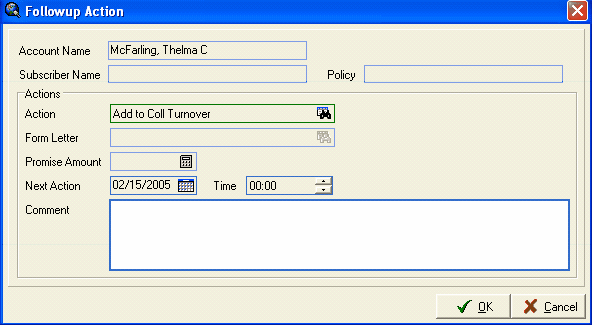
An Action may be created and used that is linked to an Action Code that has a Process Type of Collection Turnover. This is used in cases where a collector needs to manually add a visit to the Collection Turnover file.
After selecting OK to save the action, the Collection Maintenance window is displayed.
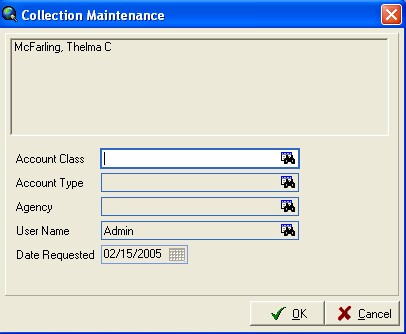
Specify the Account Class that should be assigned to the account when it is turned over to collection. If the Account Type should be changed when it is turned over to collection, specify the Account Type to which the account should be changed. Specify the Agency to which it should be sent when it is turned over to collection. These fields will all be updated to these new values when the Collection Turnover process is run and the account is turned over.
After selecting OK to save the action, you will be returned to the Queue.
After performing this action, the visit will display in yellow in the ledger to indicate that it is now in Collection Turnover. If a future Next Action date is entered, it will no longer display in the Collection Queue, and it will not display on the Next Action date either. Accounts that are in Collection Turnover do NOT display in the Queues; the assumption is that they have already been worked or are being dealt with via the Collection Turnover, and that they do not need to be worked or followed up on in the queue any longer. (Note: if the Next Action date is left as the current date, it will continue to display. We suggest that the Action set up to default the date by 1 day so that it will disappear).
Correspondence
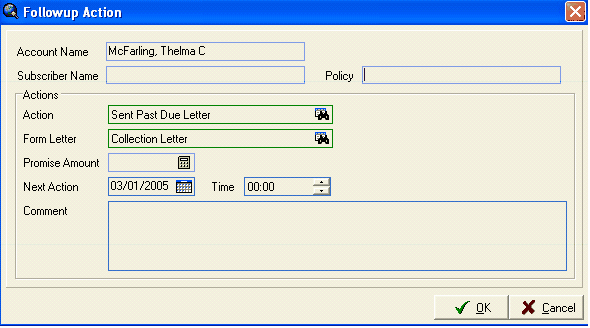
If you select an Action that is linked to an Action Code that has a Process Type of Correspondence, then the Form Letter field is required. As when you request to Send Form Letter from a ledger, you need to specify which letter you want to send. The form letter will be mail merged during the next Closeout (assuming that option is selected during the Closeout). The ledger will then display the letter that was sent and the user that sent the letter.
After selecting OK to save the action, you will be returned to the Queue. The queue entry you just worked will display in green. You may continue to take additional actions on it. To remove the green entries from your screen, simply Filter again.
Followup Wizard
Some Actions may be linked to an Action Code that have a Process Type of Followup Wizard, such as actions that involve requesting statements, refiling/reprinting claims, and resetting insurance billing.
After selecting OK to save the action, the Followup Wizard screen is displayed.
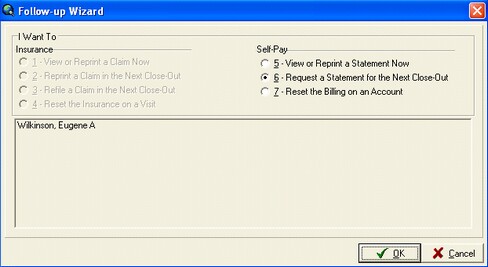
If you were working a self queue entry, only the Self-Pay options are available. If you were working on a claim, only the Insurance options are available. Select the option you want then select OK. Depending on the option, you may receive different additional pop-up boxes asking for the billing message you want on the statement, or whether you wish to force a claim refile to paper or electronic, etc. You may then receive a message that you have successfully queued a statement or claim, depending on the option selected.
After completing the Followup Wizard prompts, you will be returned to the Queue. The queue entry you just worked will display in green. You may continue to take additional actions on it. To remove the green entries from your screen, simply Filter again.
Promises - Self
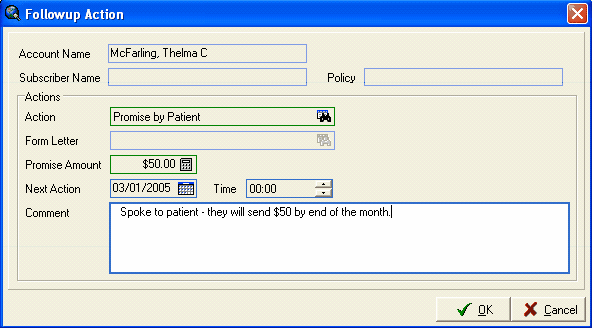
If you select an entry from a Self Pay Queue and select an Action that is linked to an Action Code that has a Process Type of Promise, then the Promise Amount field is required. Enter the amount to be paid, and then the date the account should come back into the Queue if it is NOT paid.
After selecting OK to save the action, you will be returned to the Queue.
The system will monitor that account for the payment. If no payment is received by the date specified, it will incur a "broken" status and will redisplay in the Queue on the specified Followup Date (assuming the Queue is set up to include Broken Promise statuses). If a payment is posted that is greater than or equal to the promised amount, the account will not incur a broken status and will not come back into the queue unless it meets the queue criteria at some point.
Partial Payments on Self Promises
You may need a separate Queue for monitoring promises if patients make partial payments. A partial payment that is greater than the Minimum Payment amount will reset the aging on the account, even if it is not the amount that was promised. Therefore, it is possible that it may not show up in a Self Pay Queue if your queues are set up to only show delinquent accounts such as a minimum age of 45 or 60.
To ensure that you see any accounts where the promise is broken because only a partial payment is made, create a Self Pay Queue with NO max or minimum age, and specify Only Broken Promises. Refer back to the section on Self Queue Types for examples on how to set this up.
Claims/Accounts with a broken status display in red in the queue.
Promises - Insurance
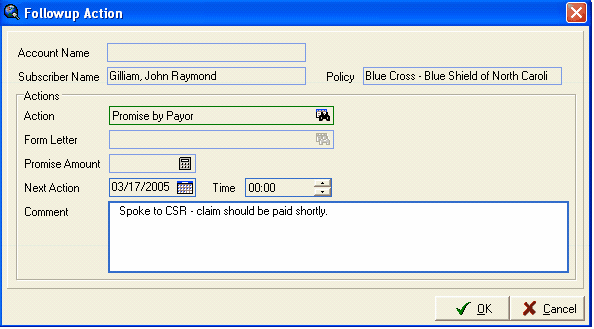
If you select an entry from an Insurance Queue and select an Action that is linked to an Action Code that has a Process Type of Promise, enter the date the claim should come back into the Queue if it is NOT paid. Note that the Promise Amount field is NOT used on promises on claims.
After selecting OK to save the action, you will be returned to the Queue.
The system will monitor that claim for the payment. If no payment is received by the date specified, it will incur a "broken" status and will redisplay in the Queue on the specified Followup Date (assuming the Queue is set up to include Broken Promise statuses). If a payment is received or a denial is posted to cause the claim to be closed, it will not come back into the queue.
FREQUENTLY ASKED QUESTIONS ABOUT THE FOLLOWUP QUEUES
Q: This patient's visit balance is 0.00. Why is the claim showing up in my queue?
A: If there is an open claim that has not had a payment or denial posted to it that closes it, if it meets the queue criteria (x # of days old, etc.) it will show in the followup queue because it is open. Until it is closed it will continue to show. This can occur, for example, if it is a secondary claim, and the secondary payment was inadvertently posted to the primary claim.
To remove the claim from the followup queue, a zero payment/denial can be entered on the open claim in order to close it, thereby removing it from the queue.
Q: This patient's visit balance is a credit balance. Why is the claim showing up in my queue?
A: The answer to this question is the same as the answer to the first question. If there is an open claim that has not had a payment or denial posted to it that closes it, if it meets the queue criteria (x # of days old, etc.) it will show in the followup queue because it is open. Until it is closed it will continue to show. To remove the claim from the followup queue, a zero payment/denial can be entered on the open claim in order to close it, thereby removing it from the queue.
Q: This patient's visit is in collections, is showing in red in the patient ledger, and the visit balance is 0.00. Why is the claim showing up in my queue?
A: The answer to this question is the same as the answer to the first two questions. If there is an open claim that has not had a payment or denial posted to it that closes it, if it meets the queue criteria (x # of days old, etc.) it will show in the followup queue because it is open. Until it is closed it will continue to show.
To remove the claim from the followup queue, a zero payment/denial can be entered on the open claim in order to close it, thereby removing it from the queue.
FOLLOWUP & THE LEDGER
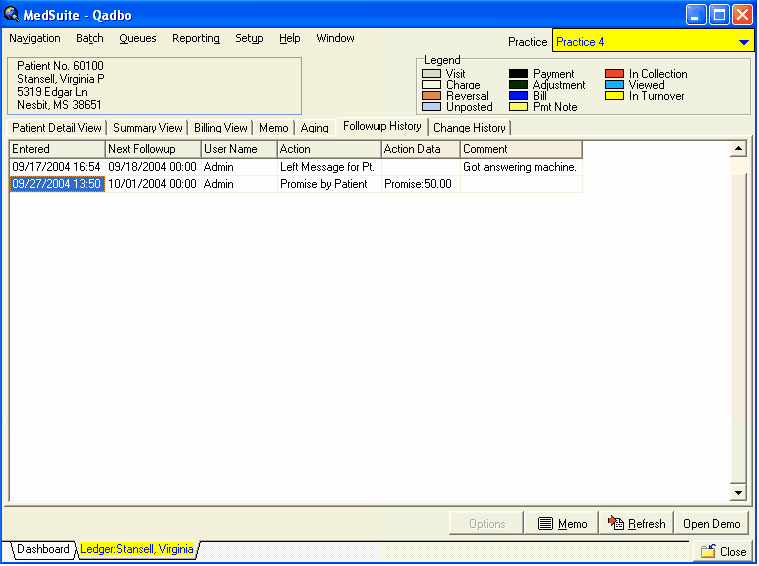
As you begin using the Followup Queue to work your accounts, the Followup History tab in the patient and account ledgers will be updated with the actions that are taking place with the Followup Queue. The date and time of the action are displayed, along with the user name and any comments they may have entered. The Action Data field will display the name of the Form Letter that was requested if the action is linked to an action code with a process type of Correspondence. It will display the amount promised if the action is linked to an action code with a process type of Promise.
One of the important fields to note here is the next followup date, which is 10/01/04 in the example above. This will be of use if users are ever wondering why a particular account is not showing in the Followup Queue. If it has a future followup date, then it is not displayed until that date. Therefore, it is possible to have accounts listed on the Self Delinquency Report that are not currently being displayed in the Followup Queue.
FOLLOWUP REPORT
The Followup Report on the Reporting menu is used to track actions that take place within the Followup Queue to analyze productivity. It may be run for a specific date range and may be run either with summary counts or with detail, which will list the specific accounts that had actions on them. When the Detail option is selected, it will show the date/time that each action was performed.
By using the available Sorting options, you may break down the activity by User, Action, Account Class, Patient, Account, etc. When sorting by Patient or Account with the Details option, it will list the patients/accounts alphabetically and the actions taken on them during the date range specified.
The Selection options will allow you to narrow down the data contained on the report by selecting certain Account Classes, Actions, Action Codes or Action Classes, etc. This could be helpful if you only wanted a list of accounts that had a Promise Action Class used on them.
To get a list of accounts worked by each user, use the Details option and Sort By User.
To get just a summary of how many of each action each user has performed, use the Counts option and Sort By User and then Action.
Experiment with the report options to see the different ways that this report might be utilized in your office.